1. LOOSEN MEMBRANE

Use the tip of a paring knife to loosen the edge of the membrane on each rack.
WHY? The papery membrane on the underside is chewy and unpleasant to eat.
2. REMOVE MEMBRANE

Pull the membrane off slowly, using a paper towel. It should come off in a single piece.
WHY? The paper towel will give you a good grip.
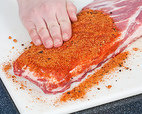
3. SEASON RIBS

Rub the ribs with a spice mixture, wrap them in plastic wrap, and refrigerate for 1 to 24 hours.
WHY? To give the rub plenty of time to season the ribs.
4. PREPARE COALS

Pour the hot coals into a steeply banked pile on one side of the grill.
WHY? By banking the coals, you’re transforming your grill into a slow, low oven, perfect for cooking ribs.
5. ADD WOOD CHIPS

Place a foil packet of soaked wood chips over the coals, cover the grill, and let them smoke for 5 minutes.
WHY? If you start the meat immediately, it will taste acrid from too much harsh smoke.
6. PLACE RIBS

Clean and oil the cooking grate, unwrap the ribs, and set them on the cool side of the grill.
WHY? So the ribs can cook low and slow without the exterior burning before the interior is tender.
7. COVER WITH FOIL

Cover the ribs loosely with aluminum foil, close the grill, and cook until the ribs are deep red, about 2 hours.
WHY? The foil will trap steam to aid in tenderizing the ribs.
8. BRUSH WITH SAUCE

Remove the ribs from the grill, brush with 1 cup of barbecue sauce, and wrap tightly in foil.
WHY? The ribs will cook for several more hours in the oven, drinking up the smoky, sweet flavor.
9. BAKE RIBS

Lay the foil-wrapped ribs on a rimmed baking sheet and move them to a preheated oven.
WHY? So the ribs can fully tenderize without your having to rebuild the charcoal fire.
10. FORK TEST

Insert a fork into the ribs and lift. If the fork pulls right out, the ribs are done. If not, the meat needs to cook longer.
WHY? To check if the ribs are truly fork-tender.
11. LET REST

Remove the ribs from the oven and let them rest, wrapped in foil, for 30 minutes.
WHY? The juice will redistribute. What does that mean? Moist ribs.
12. BRUSH, SLICE, EAT

Unwrap the ribs, brush with more barbecue sauce, slice between the bones, and eat.
WHY? We sauce the ribs twice, but not on the grill, where the sauce would burn.
Không có nhận xét nào:
Đăng nhận xét